Ryu&OvS 入り OpenWrt イメージを作成し Cisco VIRL で利用する
OpenWrt はフットプリントが小さく、VIRL 上での検証時に便利です。今回は OpenWrt に Open vSwitch (以下、OvS)と Ryu を追加し、VIRL に登録します。但し、現状では Ryu は起動するものの、Open vSwitch は Segmentation Fault を起こして利用出来ませんでした。
作業の流れ
作業は以下の流れを辿ります。
- OpenWrt イメージのダウンロード
- OpenWrt イメージのサイズ拡張
- ディスクサイズの拡張
- パーティション情報の修正
- ファイルシステムサイズの拡張
- OpenWrt イメージの起動&初期設定修正
- パッケージの追加
- Ryu のインストール
- DHCP の設定
- イメージフォーマットの変更(raw → qcow2)
- VIRL に登録する
用意するもの
以下を用意します。
- 作業の母艦となる Ubuntu
- 今回は 14.04.3 を利用
- QEMU インストール済み
- kpartx インストール済み
後述しますが、QEMU イメージのサイズを拡張する際に利用しますので、kpartx をインストールしておきます。
| apt-get -y install kpartx
|
OpenWrt イメージのダウンロード
現時点で OpenWrt の最新安定版は Barrier Breaker(14.07)です。しかし、14.07 の標準リポジトリには OvS のパッケージがありません。Chaos Calmer の標準リポジトリには OvS のパッケージが存在するのですが、インストールしようとするとエラーになってしまいます(おそらく今後、解消されると思います)。Snapshots の Trunk ビルドであればエラーにならなかったので、今回は Trunk ビルドを利用しました。
Ubuntu 上でダウンロード&展開します。
| wget https://downloads.openwrt.org/snapshots/trunk/x86/kvm_guest/openwrt-x86-kvm_guest-combined-ext4.img.gz
gunzip openwrt-x86-kvm_guest-combined-ext4.img.gz
|
OpenWrt イメージのサイズ拡張
OpenWrt の標準状態では「ディスクサイズは 50MB 程度」「利用可能領域は 40MB 程度」しかありません。
| root@OpenWrt:/# df -h
Filesystem Size Used Available Use% Mounted on
rootfs 46.5M 4.8M 40.7M 11% /
/dev/root 46.5M 4.8M 40.7M 11% /
tmpfs 441.3M 48.0K 441.2M 0% /tmp
tmpfs 512.0K 0 512.0K 0% /dev
|
パッケージを追加していくと空き容量が不足してしまう為、OpenWrt イメージのサイズを拡張します。ダウンロード直後の OpenWrt イメージを qemu-img で確認すると、確かにディスクサイズは 53M になっていました。
| # qemu-img info openwrt-x86-kvm_guest-combined-ext4.img
image: openwrt-x86-kvm_guest-combined-ext4.img
file format: raw
virtual size: 53M (55050240 bytes)
disk size: 53M
|
ディスクサイズの拡張
まず、qemu-img でディスクサイズを拡張します。今回は 1GB にしました。
| qemu-img resize openwrt-x86-kvm_guest-combined-ext4.img 1G
|
virtual size が 1GB に拡張されました。
| # qemu-img info openwrt-x86-kvm_guest-combined-ext4.img
image: openwrt-x86-kvm_guest-combined-ext4.img
file format: raw
virtual size: 1.0G (1073741824 bytes)
disk size: 53M
|
パーティション情報の修正
しかし、これだけではファイルシステム自体のサイズが拡張されていません。ディスクサイズを拡張した分に追従して、ファイルシステムのサイズも拡張します。losetup を使って OpenWrt イメージを Loopback に設定します。
| losetup /dev/loop0 openwrt-x86-kvm_guest-combined-ext4.img
|
パーティション情報を確認しておきます。
| # kpartx -l /dev/loop0
loop0p1 : 0 8192 /dev/loop0 512
loop0p2 : 0 98304 /dev/loop0 9216
|
fdisk を使ってパーティション情報を変更していきます。
念の為、パーティション情報を再確認しておきます。特に重要なのは拡張対象となる 2 つ目のパーティション(/dev/loop0p2)の開始位置です。下記では「9,216」になっています。
1
2
3
4
5
6
7
8
9
10
11
12 | Command (m for help): p
Disk /dev/loop0: 1073 MB, 1073741824 bytes
255 heads, 63 sectors/track, 130 cylinders, total 2097152 sectors
Units = sectors of 1 * 512 = 512 bytes
Sector size (logical/physical): 512 bytes / 512 bytes
I/O size (minimum/optimal): 512 bytes / 512 bytes
Disk identifier: 0x6775217f
Device Boot Start End Blocks Id System
/dev/loop0p1 * 512 8703 4096 83 Linux
/dev/loop0p2 9216 107519 49152 83 Linux
|
/dev/loop0p2 の開始位置が確認出来たら、/dev/loop0p2 を削除します。
| Command (m for help): d
Partition number (1-4): 2
|
/dev/loop0p2 をサイズ拡張して再作成します。開始位置(First sector)は必ず先に確認した数字に合わせる必要があります。
| Command (m for help): n
Partition type:
p primary (1 primary, 0 extended, 3 free)
e extended
Select (default p): p
Partition number (1-4, default 2): 2
First sector (8704-2097151, default 8704): 9216
Last sector, +sectors or +size{K,M,G} (9216-2097151, default 2097151):
Using default value 2097151
|
パーティションテーブル情報の変更を書き戻す前に、変更内容を確認しておきます。
1
2
3
4
5
6
7
8
9
10
11
12 | Command (m for help): p
Disk /dev/loop0: 1073 MB, 1073741824 bytes
255 heads, 63 sectors/track, 130 cylinders, total 2097152 sectors
Units = sectors of 1 * 512 = 512 bytes
Sector size (logical/physical): 512 bytes / 512 bytes
I/O size (minimum/optimal): 512 bytes / 512 bytes
Disk identifier: 0x6775217f
Device Boot Start End Blocks Id System
/dev/loop0p1 * 512 8703 4096 83 Linux
/dev/loop0p2 9216 2097151 1043968 83 Linux
|
パーティション情報を書き戻し、fdisk を終了します。
| Command (m for help): w
The partition table has been altered!
Calling ioctl() to re-read partition table.
WARNING: Re-reading the partition table failed with error 22: Invalid argument.
The kernel still uses the old table. The new table will be used at
the next reboot or after you run partprobe(8) or kpartx(8)
Syncing disks.
|
ファイルシステムサイズの拡張
kpartx を使ってパーティションテーブルからデバイスファイルを作成します。
/dev/mapper を確認すると、デバイスファイルが作成されていることを確認出来ます。
| # ls /dev/mapper/
control loop0p1 loop0p2
|
ファイルシステムをリサイズする前に念の為、e2fsck で整合性チェックを実行しておきます。
| e2fsck -f /dev/mapper/loop0p2
|
resize2fs でファイルシステムをリサイズします。
| resize2fs /dev/mapper/loop0p2
|
以降は後片付けです。パーティションのマッピングを削除します。
デバイスファイルのマッピングが削除されました。
| # ls /dev/mapper/
control
|
最後に Loopback を解除します。
このイメージで OpenWrt を起動してディスク使用率を確認すると以下の通り、ファイルシステムも拡張されていることが分かります。
| root@OpenWrt:/# df -h
Filesystem Size Used Available Use% Mounted on
rootfs 1007.7M 4.9M 986.8M 0% /
/dev/root 1007.7M 4.9M 986.8M 0% /
tmpfs 441.3M 48.0K 441.2M 0% /tmp
tmpfs 512.0K 0 512.0K 0% /dev
|
OpenWrt イメージの起動&初期設定修正
OpenWrt イメージを起動します。OpenWrt には virtio ドライバーが含まれていたので、NIC のモデルは virtio を指定しました。
| qemu-system-i386 \
-enable-kvm \
-m 1024 \
-k ja \
-net nic,model=virtio -net user,vlan=0 \
-serial mon:stdio -nographic \
openwrt-x86-kvm_guest-combined-ext4.img
|
OpenWrt が起動してきます。しばらくして「Please press Enter to activate this console.」と表示されたら、エンターキーを押すだけで root としてログイン出来ます。
1
2
3
4
5
6
7
8
9
10
11
12
13
14
15
16
17
18
19
20
21 | GNU GRUB version 2.02~beta2
+----------------------------------------------------------------------------+
|*OpenWrt |
| OpenWrt (failsafe) |
| |
| |
| |
| |
| |
| |
| |
| |
| |
+----------------------------------------------------------------------------+
Use the ^ and v keys to select which entry is highlighted.
Press enter to boot the selected OS, `e' to edit the commands
before booting or `c' for a command-line. ESC to return
previous menu.
The highlighted entry will be executed automatically in 5s.
|
デフォルト状態は「br-lan」というブリッジが作成されており、eth0 はそのメンバーになっています。eth0 のアドレスは 192.168.1.1/24 に固定設定されていました。
1
2
3
4
5
6
7
8
9
10
11
12
13
14
15
16
17
18
19
20
21
22
23
24
25
26 | # ifconfig -a
br-lan Link encap:Ethernet HWaddr 52:54:00:12:34:56
inet addr:192.168.1.1 Bcast:192.168.1.255 Mask:255.255.255.0
inet6 addr: fe80::5054:ff:fe12:3456/64 Scope:Link
inet6 addr: fd6b:6528:85a0::1/60 Scope:Global
UP BROADCAST RUNNING MULTICAST MTU:1500 Metric:1
RX packets:2 errors:0 dropped:0 overruns:0 frame:0
TX packets:18 errors:0 dropped:0 overruns:0 carrier:0
collisions:0 txqueuelen:0
RX bytes:1152 (1.1 KiB) TX bytes:2540 (2.4 KiB)
eth0 Link encap:Ethernet HWaddr 52:54:00:12:34:56
UP BROADCAST RUNNING MULTICAST MTU:1500 Metric:1
RX packets:2 errors:0 dropped:0 overruns:0 frame:0
TX packets:14 errors:0 dropped:0 overruns:0 carrier:0
collisions:0 txqueuelen:1000
RX bytes:1180 (1.1 KiB) TX bytes:2116 (2.0 KiB)
lo Link encap:Local Loopback
inet addr:127.0.0.1 Mask:255.0.0.0
inet6 addr: ::1/128 Scope:Host
UP LOOPBACK RUNNING MTU:65536 Metric:1
RX packets:32 errors:0 dropped:0 overruns:0 frame:0
TX packets:32 errors:0 dropped:0 overruns:0 carrier:0
collisions:0 txqueuelen:0
RX bytes:2232 (2.1 KiB) TX bytes:2232 (2.1 KiB)
|
OvS 等のパッケージをダウンロードするには外部ネットワークと通信する必要がありますので、DHCP でアドレス取得し、外部にアクセス出来るように設定変更します。udhcpc でブリッジインターフェイスを(固定アドレス設定では無く)DHCP 設定に変更します。
| # udhcpc -i br-lan
udhcpc (v1.23.2) started
Sending discover...
Sending select for 10.0.2.15...
Lease of 10.0.2.15 obtained, lease time 86400
udhcpc: ifconfig br-lan 10.0.2.15 netmask 255.255.255.0 broadcast +
udhcpc: setting default routers: 10.0.2.2
|
加えてデフォルトでは /etc/resolv.conf は以下のようになっており、名前解決出来ません。
| search lan
nameserver 127.0.0.1
|
DNS の設定を変更し、名前解決出来るようにします。例えば以下のように実行します。
| echo -e "search example.local\nnameserver 8.8.8.8\nnameserver 8.8.4.4" > /etc/resolv.conf
|
パッケージの追加
opkg update で利用可能なパッケージ情報を取得します。
任意のパッケージを追加します。今回は以下を追加しました。
- mtr
- nmap
- openvswitch
- python
- python-pip
- tcpdump
- vim
| opkg install ca-certificates curl mtr nmap openssl-util openvswitch python python-pip tcpdump vim-full
|
Ryu のインストール
Ryu をインストールする前に greenlet をインストールします。pip install greenlet するとエラーになってしまう為、ちょっとバージョンが古いですが OpenWrt 環境用に作り直してある python-greenlet を先にインストールします。
| opkg install python-greenlet_0.4.0-1_x86.ipk
|
greenlet のインストールが終わったら、Ryu をインストールします。
必ずしも必要無いのですが、pip のバージョンが古いというメッセージが出ているのでアップグレードしておきます。
| pip install --upgrade pip
|
これも必須では無いのですが、Ryu を検証する際にサンプルアプリケーションを参照しやすくする為、シンボリックリンクを作成しておきます。
| ln -s /usr/lib/python2.7/site-packages/ryu/app /root/ryu-apps
|
DHCP の設定
起動する度に br-lan(eth0)に DHCP 設定を行うのは不便です。そこで起動時は自動的に DHCP でアドレスを取得するよう、設定を修正します。ネットワークの設定は /etc/config/network で定義されています。デフォルトでは以下のようになっていました。
1
2
3
4
5
6
7
8
9
10
11
12
13
14
15
16
17
18
19
20
21
22
23
24 | config interface 'loopback'
option ifname 'lo'
option proto 'static'
option ipaddr '127.0.0.1'
option netmask '255.0.0.0'
config interface 'lan'
option ifname 'eth0'
option type 'bridge'
option proto 'static'
option ipaddr '192.168.1.1'
option netmask '255.255.255.0'
option ip6assign '60'
config interface 'wan'
option ifname 'eth1'
option proto 'dhcp'
config interface 'wan6'
option ifname 'eth1'
option proto 'dhcpv6'
config globals 'globals'
option ula_prefix 'fd6b:6528:85a0::/48'
|
eth0 部分を以下のように修正します。
| config interface 'lan'
option ifname 'eth0'
option type 'bridge'
option proto 'dhcp'
|
これで準備は完了です。ここまでの修正で空き容量は以下のようになっていました。
| root@OpenWrt:~# df -h
Filesystem Size Used Available Use% Mounted on
rootfs 1007.7M 82.3M 909.4M 8% /
/dev/root 1007.7M 82.3M 909.4M 8% /
tmpfs 441.3M 60.0K 441.2M 0% /tmp
tmpfs 512.0K 0 512.0K 0% /dev
|
OpenWrt をシャットダウンします。
イメージフォーマットの変更(raw → qcow2)
OpenWrt イメージは raw フォーマットで配布されていますが、このままでは VIRL で起動することが出来ません。イメージフォーマットを raw から qcow2 へ変更します。変換後のイメージファイル名は「openwrt-x86-kvm_guest-ovs.img」としました。
| qemu-img convert -O qcow2 openwrt-x86-kvm_guest-combined-ext4.img openwrt-x86-kvm_guest-ovs.img
|
イメージフォーマットが変更されました。
| # qemu-img info openwrt-x86-kvm_guest-ovs.img
image: openwrt-x86-kvm_guest-ovs.img
file format: qcow2
virtual size: 1.0G (1073741824 bytes)
disk size: 87M
cluster_size: 65536
Format specific information:
compat: 1.1
lazy refcounts: false
|
VIRL に登録する
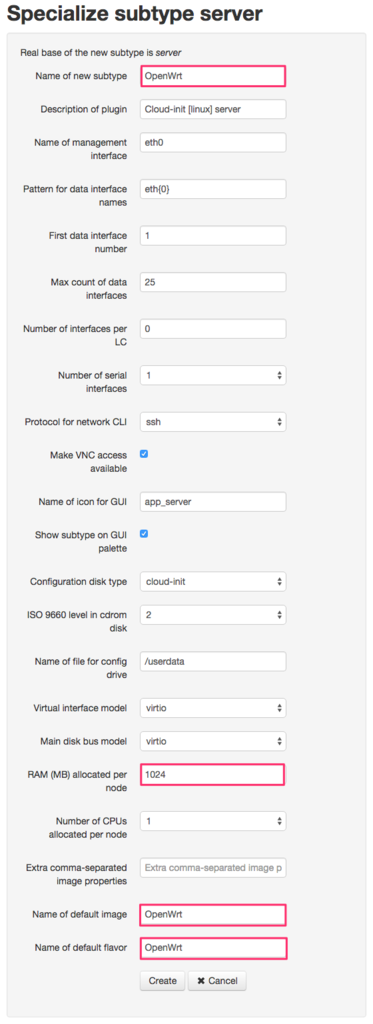
VIRL の UWM(管理画面)から Subtype は server をベースに、以下のように登録しました。
| 項目 |
値 |
| Name of new subtype |
OpenWrt |
| RAM (MB) allocated per node |
1,024 |
| Name of default image |
OpenWrt |
| Name of default flavor |
OpenWrt |
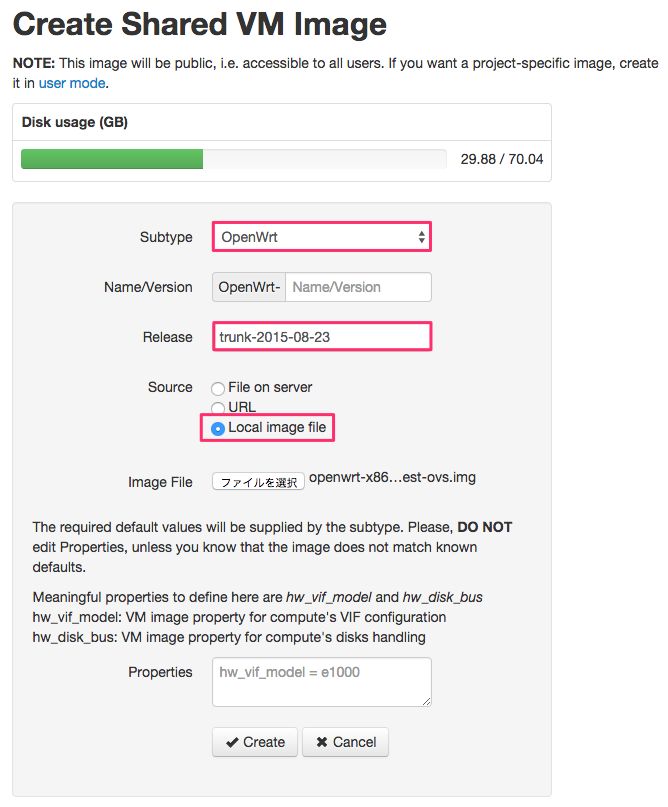
Images には以下のように登録しました。
| 項目 |
値 |
| Subtype |
OpenWrt |
| Release |
trunk-2015-08-23 |
| Source |
Local image file |
後は VMMaestro の設定画面から Node Subtypes を再読み込みすれば OpenWrt イメージが使えるようになっているはずです。
参考