Cisco VIRL のディスク領域を拡張する
Cisco VIRL を .ova ファイルから ESXi にデプロイすると、デフォルトで自由に使えるディスク領域は 70GB 程度です。これではやや心もとないので、ディスク領域を拡張してみます。今回検証した Cisco VIRL 1.0.26 は「Ubuntu + LVM」で出来ているので、具体的には LVM を拡張することになります。
作業の流れ
作業は概ね、以下の流れで進めます。
- ESXi で新規ディスクを追加する
- 新規ディスクに fdisk で LVM パーティションを作成する
- LVM を拡張する
- 新規ディスクに物理ボリュームを作成する
- ボリュームグループに新規ディスクを追加する
- 論理ボリュームに新規ディスクを追加する
- ファイルシステムをリサイズする
事前の状態
作業前のパーティション情報は以下の通りです。ここに後の手順で新規ディスク (/dev/sdb) を追加し、LVM を拡張していくことになります。
 1
 2
 3
 4
 5
 6
 7
 8
 9
10
11
12
13
14
15
16
17
18
19
20
21
22
23
24
25
26
27
28
29
30
31 | $ sudo fdisk -l
Disk /dev/sda: 83.9 GB, 83886080000 bytes
255 heads, 63 sectors/track, 10198 cylinders, total 163840000 sectors
Units = sectors of 1 * 512 = 512 bytes
Sector size (logical/physical): 512 bytes / 512 bytes
I/O size (minimum/optimal): 512 bytes / 512 bytes
Disk identifier: 0x00075d5b
Device Boot Start End Blocks Id System
/dev/sda1 * 2048 499711 248832 83 Linux
/dev/sda2 501758 163837951 81668097 5 Extended
/dev/sda5 501760 163837951 81668096 8e Linux LVM
Disk /dev/mapper/virl--vg-root: 75.2 GB, 75237425152 bytes
255 heads, 63 sectors/track, 9147 cylinders, total 146948096 sectors
Units = sectors of 1 * 512 = 512 bytes
Sector size (logical/physical): 512 bytes / 512 bytes
I/O size (minimum/optimal): 512 bytes / 512 bytes
Disk identifier: 0x00000000
Disk /dev/mapper/virl--vg-root doesn't contain a valid partition table
Disk /dev/mapper/virl--vg-swap_1: 8388 MB, 8388608000 bytes
255 heads, 63 sectors/track, 1019 cylinders, total 16384000 sectors
Units = sectors of 1 * 512 = 512 bytes
Sector size (logical/physical): 512 bytes / 512 bytes
I/O size (minimum/optimal): 512 bytes / 512 bytes
Disk identifier: 0x00000000
Disk /dev/mapper/virl--vg-swap_1 doesn't contain a valid partition table
|
作業前のボリュームグループ情報は以下の通りです。virl-vg の VG Size が 77.88GB になっているのが分かります。
 1
 2
 3
 4
 5
 6
 7
 8
 9
10
11
12
13
14
15
16
17
18
19
20
21
22
23
24
25
26
27
28
29
30
31
32
33
34
35
36
37
38
39
40
41
42 | $ sudo vgdisplay
--- Volume group ---
VG Name virl-vg
System ID
Format lvm2
Metadata Areas 1
Metadata Sequence No 3
VG Access read/write
VG Status resizable
MAX LV 0
Cur LV 2
Open LV 2
Max PV 0
Cur PV 1
Act PV 1
VG Size 77.88 GiB
PE Size 4.00 MiB
Total PE 19938
Alloc PE / Size 19938 / 77.88 GiB
Free PE / Size 0 / 0
VG UUID nXjnp3-b5ai-IBxi-peep-hajU-R1y3-6djhc6
--- Volume group ---
VG Name cinder-volumes
System ID
Format lvm2
Metadata Areas 1
Metadata Sequence No 1
VG Access read/write
VG Status resizable
MAX LV 0
Cur LV 0
Open LV 0
Max PV 0
Cur PV 1
Act PV 1
VG Size 19.53 GiB
PE Size 4.00 MiB
Total PE 4999
Alloc PE / Size 0 / 0
Free PE / Size 4999 / 19.53 GiB
VG UUID M35SMb-lP2E-qP9B-Harn-pIDa-CW7B-Uf3Qi0
|
作業前の論理ボリューム情報は以下の通りです。/dev/virl-vg/root の LV Size が 70.07GB になっているのが分かります。
 1
 2
 3
 4
 5
 6
 7
 8
 9
10
11
12
13
14
15
16
17
18
19
20
21
22
23
24
25
26
27
28
29
30
31
32
33
34 | $ sudo lvdisplay
--- Logical volume ---
LV Path /dev/virl-vg/root
LV Name root
VG Name virl-vg
LV UUID gbgup2-FDJ5-Q0R6-6y28-TJff-AvNH-WFW1s3
LV Write Access read/write
LV Creation host, time virl, 2016-02-12 00:28:17 +0000
LV Status available
# open 1
LV Size 70.07 GiB
Current LE 17938
Segments 1
Allocation inherit
Read ahead sectors auto
- currently set to 256
Block device 252:0
--- Logical volume ---
LV Path /dev/virl-vg/swap_1
LV Name swap_1
VG Name virl-vg
LV UUID f0zdIS-r3db-I3Wy-63Yf-4eA1-hP1Y-kFdaAX
LV Write Access read/write
LV Creation host, time virl, 2016-02-12 00:28:17 +0000
LV Status available
# open 2
LV Size 7.81 GiB
Current LE 2000
Segments 1
Allocation inherit
Read ahead sectors auto
- currently set to 256
Block device 252:1
|
ESXi 上からディスクを追加する
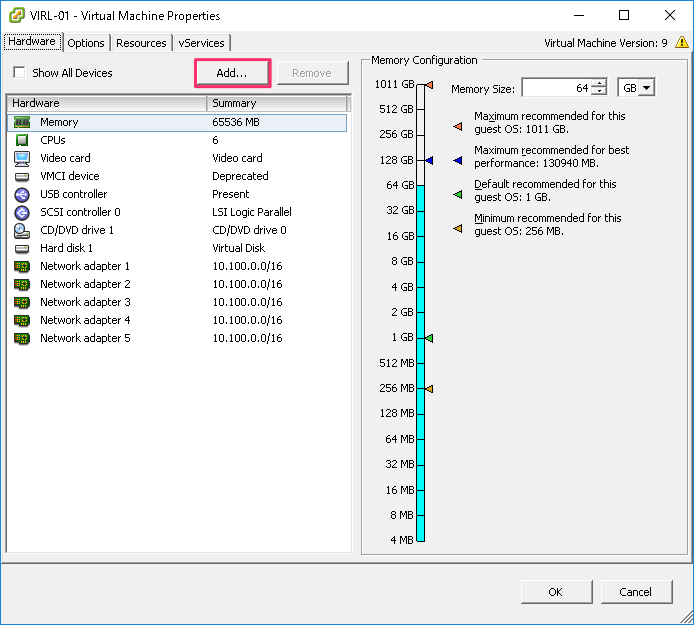
ここからは仮想マシンの電源をオフにしてから作業を行います。ESXi から VIRL 仮想マシンの構成を編集します (私の環境に合わせて、スクリーンショットと説明は英語表示です)。Hardware タブから Add... をクリックします。
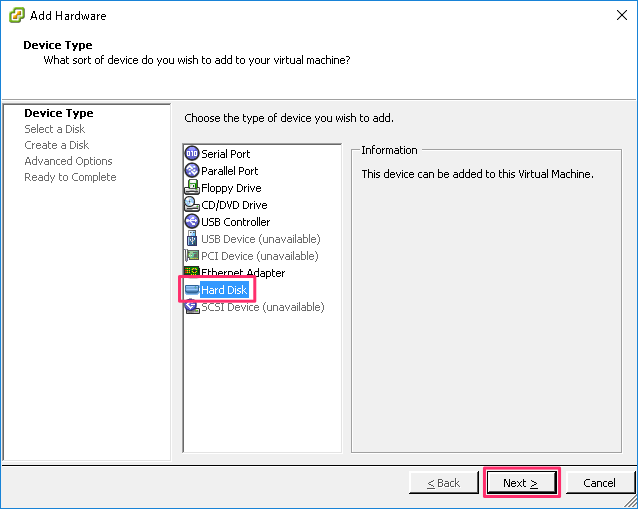
Hard Disk を選択し、Next をクリックします。
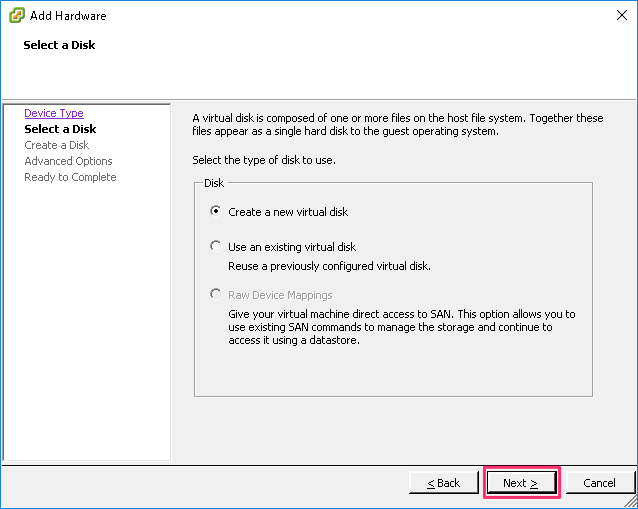
新規ディスクを作成 (追加) しますので、Create a new virtual disk が選択されたままの状態で Next をクリックします。
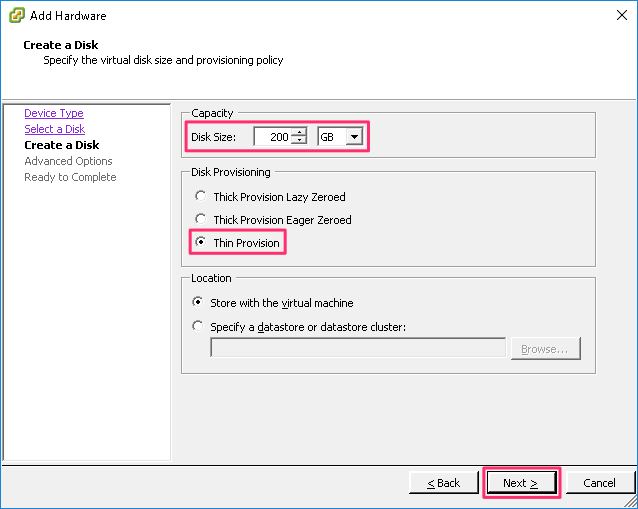
Disk Size は任意で指定します。今回は 200GB としました。Disk Provisioning は Thin Provision を選択しました。Next をクリックします。
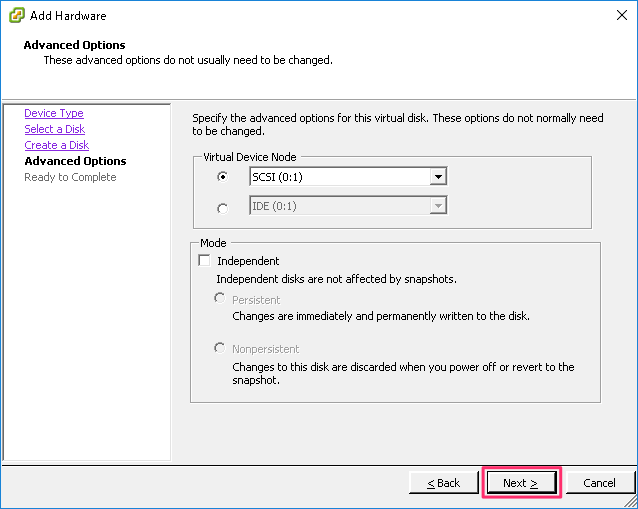
Virtual Device Node は SCSI のまま、Next をクリックします。
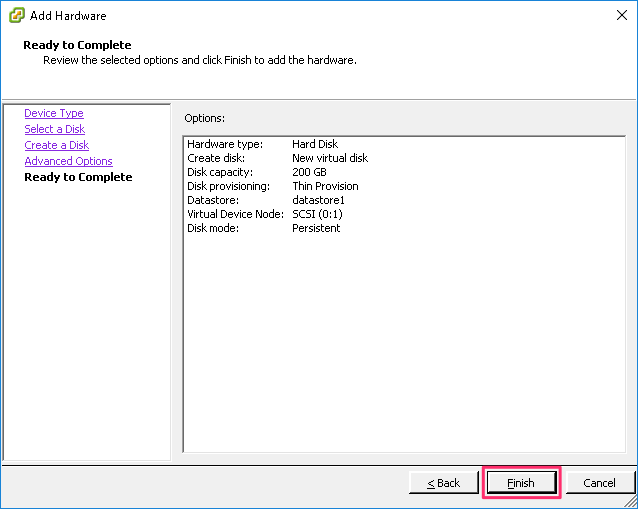
ここまでの設定値一覧が表示されます。問題無ければ Finish をクリックします。
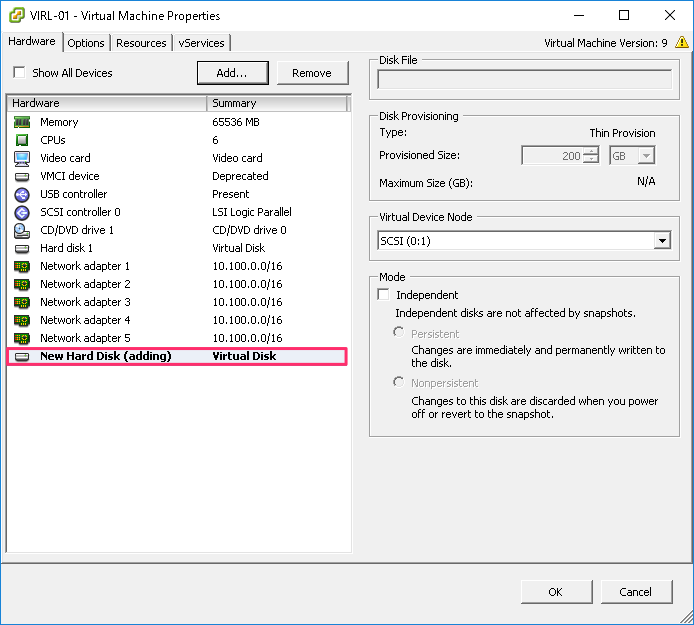
追加されたディスクは New Hard Disk (adding) として表示されます。OK を押して構成編集を終了し、仮想マシンを開始します。
VIRL が起動したらディスクが追加されたか、確認します。2 つ目のディスクなので、/dev/sdb が増えていれば OK です。
| $ ls /dev/sd*
/dev/sda /dev/sda1 /dev/sda2 /dev/sda5 /dev/sdb
|
fdisk でパーティション情報を確認すると以下のように「パーティション情報が無い」と表示されるはずです。この後の手順でパーティションを作成していきます。
| $ sudo fdisk -l /dev/sdb
Disk /dev/sdb: 214.7 GB, 214748364800 bytes
255 heads, 63 sectors/track, 26108 cylinders, total 419430400 sectors
Units = sectors of 1 * 512 = 512 bytes
Sector size (logical/physical): 512 bytes / 512 bytes
I/O size (minimum/optimal): 512 bytes / 512 bytes
Disk identifier: 0x00000000
Disk /dev/sdb doesn't contain a valid partition table
|
パーティションを作成する
fdisk で新規に追加したディスクにパーティションを作成します。今回はディスク全体を丸ごとひとつのパーティションとして扱います。まず、fdisk を開始して対話的に設定を進めていきます。
| $ sudo fdisk /dev/sdb
Device contains neither a valid DOS partition table, nor Sun, SGI or OSF disklabel
Building a new DOS disklabel with disk identifier 0xfcea88bf.
Changes will remain in memory only, until you decide to write them.
After that, of course, the previous content won't be recoverable.
Warning: invalid flag 0x0000 of partition table 4 will be corrected by w(rite)
|
n を入力して新規パーティションの作成を開始します。
Primary パーティションを作成するので、p を入力します。
| Partition type:
p primary (0 primary, 0 extended, 4 free)
e extended
Select (default p): p
|
パーティション番号は 1 を入力します。
| Partition number (1-4, default 1): 1
|
セクター開始位置ですが、デフォルトで最小値(先頭)になっていますので、そのままエンターを入力します。
| First sector (2048-419430399, default 2048):
Using default value 2048
|
同様にセクター終了位置もデフォルトでは最大値(最後尾)になっていますので、そのままエンターを入力します。
| Last sector, +sectors or +size{K,M,G} (2048-419430399, default 419430399):
Using default value 419430399
|
一旦、p を入力してパーティションテーブルを確認してみます。/dev/sdb1 が作成されたことが分かります。
| Command (m for help): p
Disk /dev/sdb: 214.7 GB, 214748364800 bytes
255 heads, 63 sectors/track, 26108 cylinders, total 419430400 sectors
Units = sectors of 1 * 512 = 512 bytes
Sector size (logical/physical): 512 bytes / 512 bytes
I/O size (minimum/optimal): 512 bytes / 512 bytes
Disk identifier: 0xfcea88bf
Device Boot Start End Blocks Id System
/dev/sdb1 2048 419430399 209714176 83 Linux
|
作成したパーティションを LVM として扱う為、パーティション ID を変更します。t を入力します。
| Command (m for help): t
Selected partition 1
|
8e を入力します (8e は Linux LVM)。
| Hex code (type L to list codes): 8e
Changed system type of partition 1 to 8e (Linux LVM)
|
再度、p を入力してパーティションテーブルを表示し、ID が 8e (Linux LVM) に変更されていることを確認します。
| Command (m for help): p
Disk /dev/sdb: 214.7 GB, 214748364800 bytes
255 heads, 63 sectors/track, 26108 cylinders, total 419430400 sectors
Units = sectors of 1 * 512 = 512 bytes
Sector size (logical/physical): 512 bytes / 512 bytes
I/O size (minimum/optimal): 512 bytes / 512 bytes
Disk identifier: 0xfcea88bf
Device Boot Start End Blocks Id System
/dev/sdb1 2048 419430399 209714176 8e Linux LVM
|
パーティションテーブルを書き込んで終了です。
| Command (m for help): w
The partition table has been altered!
Calling ioctl() to re-read partition table.
WARNING: If you have created or modified any DOS 6.x
partitions, please see the fdisk manual page for additional
information.
Syncing disks.
|
LVM を拡張する
次は LVM を拡張します。まず、pvcreate で新規作成したディスク /dev/sdb1 に物理ボリュームを作成します。
| $ sudo pvcreate /dev/sdb1
Physical volume "/dev/sdb1" successfully created
|
pvscan で物理ボリュームの状態を確認すると、/dev/sdb1 が追加されたことが分かります。
| $ sudo pvscan
PV /dev/sda5 VG virl-vg lvm2 [77.88 GiB / 0 free]
PV /dev/sdb1 VG virl-vg lvm2 [200.00 GiB / 200.00 GiB free]
PV /dev/loop0 VG cinder-volumes lvm2 [19.53 GiB / 19.53 GiB free]
Total: 3 [297.41 GiB] / in use: 3 [297.41 GiB] / in no VG: 0 [0 ]
|
次はボリュームグループに /dev/sdb1 を追加します。追加前にボリュームグループの状態を確認しておきます。
1
2
3
4
5
6
7
8
9
10
11
12
13
14
15
16
17
18
19
20
21
22
23
24
25
26
27
28
29
30
31
32
33
34
35
36
37
38
39
40
41
42 | $ sudo vgdisplay
--- Volume group ---
VG Name virl-vg
System ID
Format lvm2
Metadata Areas 1
Metadata Sequence No 3
VG Access read/write
VG Status resizable
MAX LV 0
Cur LV 2
Open LV 2
Max PV 0
Cur PV 1
Act PV 1
VG Size 77.88 GiB
PE Size 4.00 MiB
Total PE 19938
Alloc PE / Size 19938 / 77.88 GiB
Free PE / Size 0 / 0
VG UUID nXjnp3-b5ai-IBxi-peep-hajU-R1y3-6djhc6
--- Volume group ---
VG Name cinder-volumes
System ID
Format lvm2
Metadata Areas 1
Metadata Sequence No 1
VG Access read/write
VG Status resizable
MAX LV 0
Cur LV 0
Open LV 0
Max PV 0
Cur PV 1
Act PV 1
VG Size 19.53 GiB
PE Size 4.00 MiB
Total PE 4999
Alloc PE / Size 0 / 0
Free PE / Size 4999 / 19.53 GiB
VG UUID M35SMb-lP2E-qP9B-Harn-pIDa-CW7B-Uf3Qi0
|
virl-vg に /dev/sdb1 を追加し、ボリュームグループを拡張します。
| $ sudo vgextend virl-vg /dev/sdb1
Volume group "virl-vg" successfully extended
|
再度、ボリュームグループの状態を表示します。VG Size が /dev/sdb1 (200GB) の分、拡張されているのが分かります。
 1
 2
 3
 4
 5
 6
 7
 8
 9
10
11
12
13
14
15
16
17
18
19
20
21
22
23
24
25
26
27
28
29
30
31
32
33
34
35
36
37
38
39
40
41
42 | $ sudo vgdisplay
--- Volume group ---
VG Name virl-vg
System ID
Format lvm2
Metadata Areas 2
Metadata Sequence No 4
VG Access read/write
VG Status resizable
MAX LV 0
Cur LV 2
Open LV 2
Max PV 0
Cur PV 2
Act PV 2
VG Size 277.88 GiB
PE Size 4.00 MiB
Total PE 71137
Alloc PE / Size 19938 / 77.88 GiB
Free PE / Size 51199 / 200.00 GiB
VG UUID nXjnp3-b5ai-IBxi-peep-hajU-R1y3-6djhc6
--- Volume group ---
VG Name cinder-volumes
System ID
Format lvm2
Metadata Areas 1
Metadata Sequence No 1
VG Access read/write
VG Status resizable
MAX LV 0
Cur LV 0
Open LV 0
Max PV 0
Cur PV 1
Act PV 1
VG Size 19.53 GiB
PE Size 4.00 MiB
Total PE 4999
Alloc PE / Size 0 / 0
Free PE / Size 4999 / 19.53 GiB
VG UUID M35SMb-lP2E-qP9B-Harn-pIDa-CW7B-Uf3Qi0
|
次は論理ボリュームに /dev/sdb1 を追加します。追加前に論理ボリュームの状態を確認しておきます。
1
2
3
4
5
6
7
8
9
10
11
12
13
14
15
16
17
18
19
20
21
22
23
24
25
26
27
28
29
30
31
32
33
34 | $ sudo lvdisplay
--- Logical volume ---
LV Path /dev/virl-vg/root
LV Name root
VG Name virl-vg
LV UUID gbgup2-FDJ5-Q0R6-6y28-TJff-AvNH-WFW1s3
LV Write Access read/write
LV Creation host, time virl, 2016-02-12 00:28:17 +0000
LV Status available
# open 1
LV Size 70.07 GiB
Current LE 17938
Segments 1
Allocation inherit
Read ahead sectors auto
- currently set to 256
Block device 252:0
--- Logical volume ---
LV Path /dev/virl-vg/swap_1
LV Name swap_1
VG Name virl-vg
LV UUID f0zdIS-r3db-I3Wy-63Yf-4eA1-hP1Y-kFdaAX
LV Write Access read/write
LV Creation host, time virl, 2016-02-12 00:28:17 +0000
LV Status available
# open 2
LV Size 7.81 GiB
Current LE 2000
Segments 1
Allocation inherit
Read ahead sectors auto
- currently set to 256
Block device 252:1
|
/dev/virl-vg/root に /dev/sdb1 を追加し、論理ボリュームを拡張します。
| $ sudo lvextend /dev/virl-vg/root /dev/sdb1
Extending logical volume root to 270.07 GiB
Logical volume root successfully resized
|
再度、論理ボリュームの状態を表示します。VG Size が /dev/sdb1 (200GB) の分、拡張されているのが分かります。
1
2
3
4
5
6
7
8
9
10
11
12
13
14
15
16
17
18
19
20
21
22
23
24
25
26
27
28
29
30
31
32
33
34 | $ sudo lvdisplay
--- Logical volume ---
LV Path /dev/virl-vg/root
LV Name root
VG Name virl-vg
LV UUID gbgup2-FDJ5-Q0R6-6y28-TJff-AvNH-WFW1s3
LV Write Access read/write
LV Creation host, time virl, 2016-02-12 00:28:17 +0000
LV Status available
# open 1
LV Size 270.07 GiB
Current LE 69137
Segments 2
Allocation inherit
Read ahead sectors auto
- currently set to 256
Block device 252:0
--- Logical volume ---
LV Path /dev/virl-vg/swap_1
LV Name swap_1
VG Name virl-vg
LV UUID f0zdIS-r3db-I3Wy-63Yf-4eA1-hP1Y-kFdaAX
LV Write Access read/write
LV Creation host, time virl, 2016-02-12 00:28:17 +0000
LV Status available
# open 2
LV Size 7.81 GiB
Current LE 2000
Segments 1
Allocation inherit
Read ahead sectors auto
- currently set to 256
Block device 252:1
|
最後にファイルシステムをリサイズします。ファイルシステムは XFS なので、xfs_growfs を使います。
| $ sudo xfs_growfs /dev/virl-vg/root
meta-data=/dev/mapper/virl--vg-root isize=256 agcount=4, agsize=4592128 blks
= sectsz=512 attr=2
data = bsize=4096 blocks=18368512, imaxpct=25
= sunit=0 swidth=0 blks
naming =version 2 bsize=4096 ascii-ci=0
log =internal bsize=4096 blocks=8969, version=2
= sectsz=512 sunit=0 blks, lazy-count=1
realtime =none extsz=4096 blocks=0, rtextents=0
data blocks changed from 18368512 to 70796288
|
状態確認
df でディスク容量情報を表示します。/dev/mapper/virl--vg-root の容量が拡張されているのが分かります。
| $ df -h
Filesystem Size Used Avail Use% Mounted on
udev 32G 4.0K 32G 1% /dev
tmpfs 6.3G 3.9M 6.3G 1% /run
/dev/mapper/virl--vg-root 271G 50G 221G 19% /
none 4.0K 0 4.0K 0% /sys/fs/cgroup
none 5.0M 0 5.0M 0% /run/lock
none 32G 80K 32G 1% /run/shm
none 100M 4.0K 100M 1% /run/user
/dev/sda1 236M 79M 146M 36% /boot
|